
Understanding the difference between end-grain and edge-grain is vital for your woodworking success. End-grain shows the wood’s cut across the fibers, making it more textured, porous, and prone to damage, perfect for rustic looks and stain absorption. Edge-grain runs along the fibers, offering a smooth, stable surface ideal for precise joints. Many get this wrong, but if you keep exploring, you’ll discover how mastering these orientations can transform your projects.
Key Takeaways
- End-grain shows the wood fiber ends and absorbs finishes more deeply, while edge-grain runs parallel, offering a smoother surface.
- Cutting end-grain requires more precision and fine blades to prevent tear-out; edge-grain cuts are generally easier and cleaner.
- End-grain is more susceptible to dents, scratches, and damage, demanding careful handling compared to the more durable edge-grain.
- Finish absorption differs: end-grain creates a textured or rustic look, whereas edge-grain yields a smoother, more stable surface.
- Recognizing the grain orientation is crucial for proper technique, affecting both cutting methods and final aesthetics.
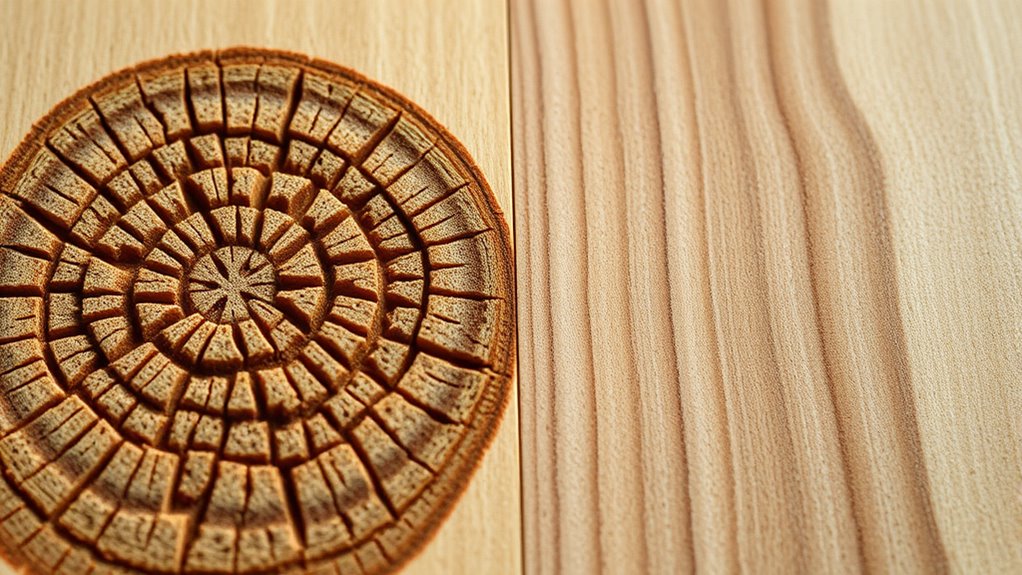
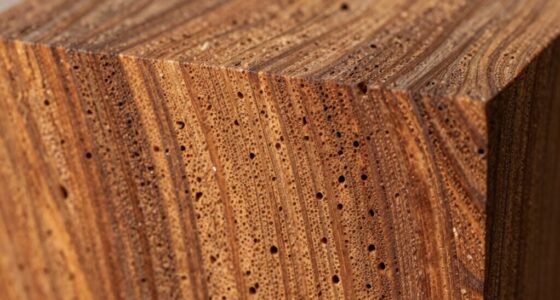
End-grain refers to the surface where the wood fibers are cut perpendicular to their length, exposing the ends of the wood cells. Because of this orientation, end-grain tends to absorb stains and finishes more readily, often resulting in a more rustic or textured appearance. When working with end-grain, your cutting techniques need to be precise. You’ll find that power tools, like saws and routers, require adjustments to account for the grain’s orientation. For example, cutting across the end-grain can cause splintering or tear-out if you don’t use sharp blades or proper feed rates. It’s best to make slow, controlled cuts and to use blades with fine teeth to minimize damage and achieve cleaner results. Additionally, end-grain surfaces are more prone to dents and scratches, so care must be taken during handling and finishing.
End-grain, cut perpendicular to fibers, absorbs stain easily, but requires precise, slow cuts with fine-tooth blades.
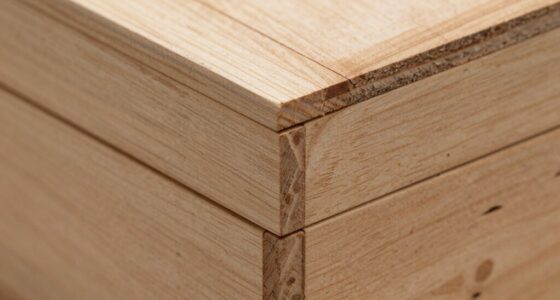
Edge-grain, on the other hand, refers to the surface where the side of the board is cut parallel to the grain. This orientation runs along the length of the fibers, making it more stable and easier to work with. When you work with edge-grain, your cutting techniques are generally simpler because the fibers are aligned in a way that produces fewer splinters and tear-outs. This grain orientation lends itself well to creating smooth, stable surfaces and tight joints. To maximize the benefits of edge-grain, always cut with the grain direction in mind, and use sharp tools to maintain control and precision. Recognizing the grain orientation is essential for selecting the right woodworking techniques and achieving professional results.

WEN BL1060 10-Inch 60-Tooth Fine-Finish Professional Woodworking Saw Blade for Miter Saws and Table Saws, Silver,Pack of one
Featuring a 10-inch diameter (254 mm), a 5/8-inch arbor (15.88 mm) and a rating of up to 6000…
As an affiliate, we earn on qualifying purchases.
As an affiliate, we earn on qualifying purchases.
Frequently Asked Questions
How Does Grain Orientation Affect Wood Durability?
Grain orientation considerably impacts wood durability because it influences the grain structure and moisture resistance. When you choose end-grain, it’s more resistant to moisture and splitting, making your project last longer. Conversely, edge-grain is more prone to moisture absorption and damage. By understanding how grain structure affects durability, you can select the right orientation for your needs, ensuring your woodworking projects are both strong and long-lasting.
Can End-Grain and Edge-Grain Be Combined in Projects?
Ever thought about mixing grain orientations? Yes, you can combine end-grain and edge-grain in projects using proper joint techniques. Grain mixing adds visual interest and structural strength when done correctly. Focus on aligning the grains carefully and choosing suitable joints like dowels or biscuits. This approach enhances durability while achieving a unique aesthetic. Just remember, understanding how each grain type interacts helps you create more stable, beautiful woodwork.
What Finishes Work Best for Each Grain Type?
For end-grain, you should use a finish that seals the grain well, like oil-based finishes or shellac, to prevent excessive absorption and guarantee durability. For edge-grain, a finish with good adhesion, such as polyurethane or varnish, works best because the surface is flatter and absorbs less. Proper grain sealing enhances finish adhesion and prolongs your project’s lifespan, giving a professional look and feel.
Are There Specific Tools Suited for Each Grain Orientation?
You should choose your tools based on the grain orientation, focusing on grain cutting techniques. For end-grain, use sharp, fine-toothed saws and chisels to prevent tearing and get clean cuts. For edge-grain, broader blades and planers work well to smooth surfaces efficiently. Proper tool selection guarantees cleaner cuts, reduces damage, and saves you time, making your project look professional regardless of the grain orientation you’re working with.
How Do Grain Types Influence Woodworking Safety Considerations?
Think of wood grain as the backbone of your project; it directly impacts safety. With end-grain, you’re more prone to grain cracking and splinters, so always wear gloves and eye protection. For edge-grain, watch out for tear-out that can cause accidents. Following safety precautions tailored to each grain type keeps your workspace safe. By respecting the grain’s nature, you minimize hazards and create quality work confidently.

HQMaster CNC Router Bits 1/8" Shank CNC Bit End Mill Flat Nose Carbide Endmill Two Flute Spiral Upcut Milling Cutter Tool Set for Wood PVC MDF Hardwood 10Pcs (1/8"CED x 1/8"SD x 11/16"CEL x 1-1/2"OAL)
RANGE OF PROCESSING: For carving/cutting/engraving/milling/slotting/sculpturing in materials like MDF, ABS, PVC, acrylic, nylon, resin, plastics, density board, wood,…
As an affiliate, we earn on qualifying purchases.
As an affiliate, we earn on qualifying purchases.
Conclusion
Think of end-grain and edge-grain as two dancers in a grand ballet, each with its own role and rhythm. Mastering their differences lets you choreograph stunning woodworking pieces, where strength and beauty move in harmony. Ignoring these nuances is like trying to teach a dancer the wrong steps—disrupting the performance. Embrace the dance, understand the lead and follow, and your projects will flow with grace and precision, revealing craftsmanship that truly stands out.

Beginner-Friendly Wood Carving Kit, 15pc Wood Carving Tools Set with Razor Sharp Carving Knives & Mini Chisels, Linoleum Carving, and Woodworking for DIY Crafts from Schaaf (Large)
New Woodcut Tools Handle Design – Each small carving knife is made with ergonomic beech handles, now beautifully…
As an affiliate, we earn on qualifying purchases.
As an affiliate, we earn on qualifying purchases.
Varathane 331305 Aged Wood Accelerator, Quart, Brown
For interior use on bare or untreated wood to create an aged look
As an affiliate, we earn on qualifying purchases.
As an affiliate, we earn on qualifying purchases.