Start by defining clear zones for cutting, pressing, and stitching based on your workflow. Place the cutting table near fabric storage for quick access, and position your pressing station close to it for efficiency. Arrange your sewing machine in a comfortable spot with ample space, ensuring smooth shifts between zones. Use organized storage for notions and tools, and plan lighting that reduces eye strain. If you keep these tips in mind, you’ll create a functional, smooth-flowing sewing room—more helpful ideas follow.
Key Takeaways
- Arrange zones logically to minimize movement, placing cutting near fabric storage, pressing next to cutting, and stitching in a comfortable, accessible area.
- Use clear storage solutions and labeled bins for notions, threads, and trims, ensuring easy access across all zones.
- Position adjustable lighting at each station to enhance visibility, reduce eye strain, and ensure safety during detailed tasks.
- Incorporate ergonomic furniture and ensure ample space for large tools like cutting mats and ironing boards for comfort and efficiency.
- Design the workflow to promote smooth transitions between zones, maintaining an organized, clutter-free environment for productivity.
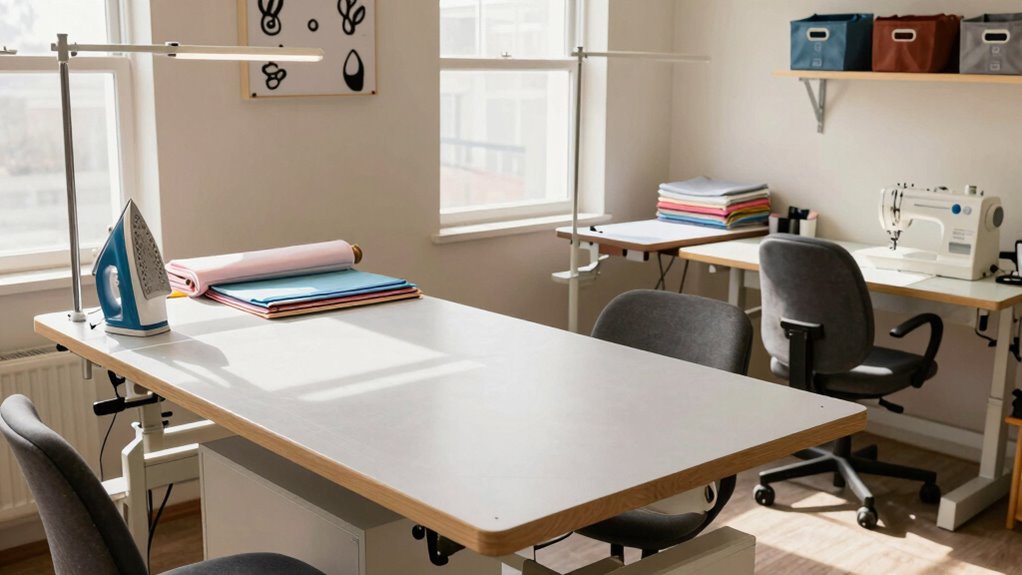
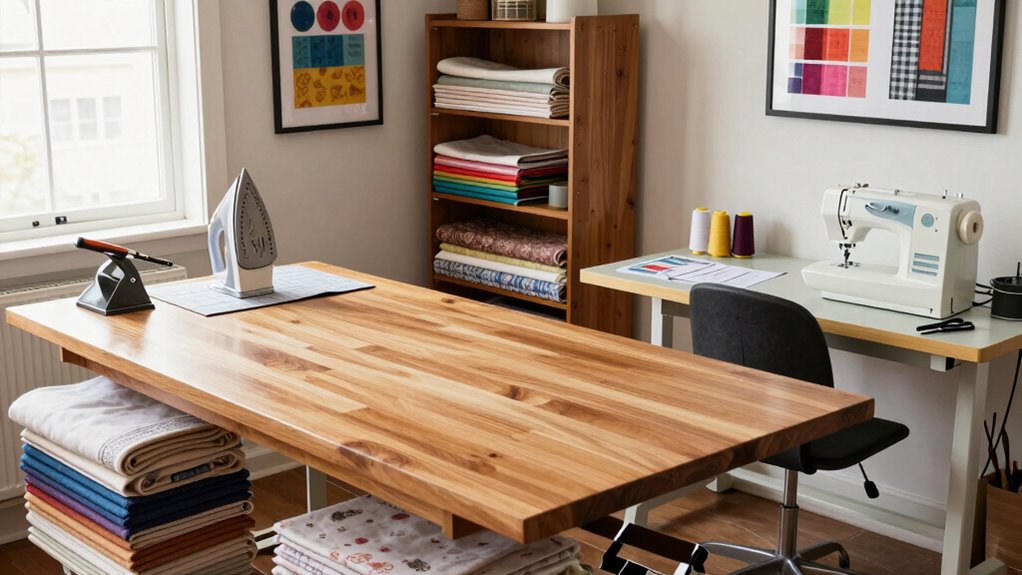
Creating a well-organized sewing room begins with careful planning, so you can maximize your space and make your sewing projects more enjoyable. When designing your space around cutting, pressing, and stitching zones, it’s essential to contemplate how each area will function seamlessly together. Start by defining each zone based on your workflow, assuring that they flow logically from one to the next. For example, position your cutting table near your fabric storage, your pressing station close to the cutting area for quick access, and your sewing machine in a comfortable spot with ample space to move freely. This arrangement minimizes unnecessary movement and boosts efficiency. Incorporating smart storage solutions is key to keeping your sewing room tidy and functional. Use clear bins or labeled drawers for notions, threads, and trims, so everything is easy to find. Install wall-mounted shelves above your pressing station for frequently used tools like irons, pressing mats, and starch sprays. Underneath your cutting table, regard adding rolling carts or drawers for fabric bolts or scraps, which keeps your workspace uncluttered. For larger items, like cutting mats or ironing boards, allocate specific spots that are easily accessible but don’t interfere with your workflow. Adequate storage not only keeps your room organized but also ensures you can focus on your sewing without searching for supplies. Additionally, considering lighting considerations is crucial, as proper lighting helps reduce eye strain and ensures precise cuts and stitches. Position your main light source overhead, ideally with adjustable brightness, to evenly illuminate the entire room. Task lighting is equally important—place a bright, focused light at your cutting station to see fabric details clearly. For pressing and pressing stations, install adjustable lamps or dedicated spotlights so you can see fabric textures and seams accurately. Proper lighting also enhances safety by making hazards more visible, which is essential during detailed work. Incorporating energy-efficient lighting options can also help reduce electricity costs while maintaining optimal illumination. Good lighting enhances safety, precision, and your overall sewing experience, making each zone more effective. To further improve your space, consider ergonomic furniture that supports comfort during long sewing sessions.

Sew Ready Foldable Hobby and Cutting Grid Table with Grid Top and Storage Drawers for Arts and Crafts, 58.75" W x 36.5" D Table Size, White
Foldable Crafting Table: Hobby and Cutting Grid Table features a spacious 58.75-inch work surface with printed grid guides…
As an affiliate, we earn on qualifying purchases.
As an affiliate, we earn on qualifying purchases.
Frequently Asked Questions
How Much Space Is Needed for Each Sewing Zone?
You’ll want about 3-4 feet of space for each sewing zone to guarantee comfortable movement and good workspace ergonomics. For cutting, allocate enough room for fabric storage and a sturdy table. Pressing needs a dedicated area with enough space for pressing tools and fabric, while stitching requires a clear, organized workspace. Properly spacing each zone helps prevent clutter, making your sewing process more efficient and enjoyable.
What Lighting Is Best for Sewing Rooms?
Imagine your sewing room as a stage—bright, focused lighting makes every detail clear. LED lighting is your best choice, offering energy-efficient, consistent illumination. Incorporate task lighting at each station to reduce shadows and eye strain, especially during intricate work. Good lighting isn’t just functional; it sets the mood, making sewing enjoyable and precise. So, invest in adjustable LED task lights to create a well-lit, inspiring workspace.
How Should Storage Be Organized for Fabric and Tools?
You should organize your fabric storage by using clear bins or shelves, making it easy to see and access your fabric choices. For tool storage, install pegboards or small drawers to keep scissors, thread, and other essentials within reach. Keep frequently used items close to your sewing machine and designate specific areas for different tools and fabrics, which helps maintain an efficient workflow and keeps your sewing space tidy.
What Ventilation Options Are Recommended in Sewing Rooms?
Ventilation varieties essentialize your sewing space, ensuring fresh airflow and safety. You should consider air filtration systems that trap dust, fibers, and fumes, keeping the air clean and breathable. Additionally, moisture control options like dehumidifiers or exhaust fans help prevent mold and mildew, especially in humid environments. Proper ventilation not only improves air quality but also maintains a comfortable, healthy sewing sanctuary where you can stitch, press, and create comfortably.
How to Create an Ergonomic Layout for Long Sewing Sessions?
To create an ergonomic layout for long sewing sessions, prioritize maintaining ergonomic posture by adjusting your chair and workspace height. Use a supportive chair with proper lumbar support and keep your sewing machine at waist level to avoid repetitive strain. Arrange tools within easy reach to minimize unnecessary movement. Incorporate a comfortable, well-lit workspace, and take regular breaks to stretch, helping prevent fatigue and promoting better posture during extended sewing periods.

Micomlan Architect Desk Lamp with Atmosphere Lighting, Adjustable Led Desk Light for Home Office with Base, 24W Bright Auto Dimming Table Light with Rotatable Swing Arm for Workbench Computer
5 Rotatable Joints: Crafted to enhance your productivity, this rotatable led desk lamp features 5 rotatable joints, granting…
As an affiliate, we earn on qualifying purchases.
As an affiliate, we earn on qualifying purchases.
Conclusion
By thoughtfully organizing your sewing room into dedicated cutting, pressing, and stitching zones, you’re creating a space that’s as smooth as a well-oiled machine. When each area has its purpose, your workflow becomes seamless, and sewing becomes more enjoyable. Think of your room like a well-choreographed dance, where every step flows naturally into the next. With careful planning, you’ll craft a space that’s both efficient and inspiring, making every project a pleasure from start to finish.

IRIS USA Clear Storage Cases, 10-Pack, |Made in USA|, Plastic Bead Organizing Containers with Snap Lid for Arts, Crafts, Ephemera, Stickers, & Dance Cheer, Clear – Small
DIMENSIONS: 5.13"L x 5.13"W x 2"H (Inside dimension: 4.38"L x 4.5"W x 1.63"H). Perfectly sized portable organizer. Great…
As an affiliate, we earn on qualifying purchases.
As an affiliate, we earn on qualifying purchases.

Primy Drafting Chair Tall Office Chair with Flip-up Armrests Executive Ergonomic Computer Standing Desk Chair with Lumbar Support and Adjustable Footrest Ring (Black)
Adjustable Drafting Chair:This high rotary drawing chair has a foot stool with adjustable height, and the 90 degree…
As an affiliate, we earn on qualifying purchases.
As an affiliate, we earn on qualifying purchases.