To photograph your handmade work in winter light, focus on using natural light near a window during the softer morning or late afternoon hours. Diffuse harsh sunlight with sheer curtains and experiment with angles to highlight textures without special equipment. Keep backgrounds simple to emphasize your work, and adjust your camera settings for the best shot. Patience and attention to light quality will help you capture warm, inviting images—keep going to discover more tips.
Key Takeaways
- Shoot near windows with sheer curtains during winter mornings or late afternoons for soft, diffused natural light.
- Use simple backgrounds and neutral or complementary colors to highlight the handmade work.
- Position the piece to capture gentle shadows that emphasize textures without harsh contrasts.
- Bounce natural light using household reflectors like white cardboard to soften shadows and add warmth.
- Keep the camera steady and adjust settings (low ISO, wider aperture) to ensure clear, true-to-life images without fancy gear.

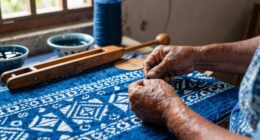
Winter light offers a soft, diffused glow that can beautifully highlight handmade work, but capturing its true essence requires some planning. Since you’re working with natural light, you’ll want to make the most of its gentle qualities. Early mornings or late afternoons tend to produce the best light, with a warmer tone that enhances textures and details. Avoid shooting during midday when sunlight is harsh and creates strong shadows; instead, look for cloudy days or position your work near windows with sheer curtains to soften the light further.
Capture the soft, warm glow of winter light by shooting near windows or on cloudy days for beautiful handmade photos.
When you’re setting up your shot, pay close attention to composition tips that help your handmade work stand out. Use the rule of thirds to position your piece off-center, which adds visual interest and allows the light to create natural shadows that add depth. Keep the background simple and uncluttered so the focus remains on your craft. A neutral or complementary backdrop works best, but don’t be afraid to experiment with textures or subtle colors that enhance the handmade qualities of your piece.
Lighting angles are essential when working with winter light. Position your work so that the light hits it at a slight angle, emphasizing textures and details without creating harsh shadows. You might need to move your piece or yourself to find the perfect spot where the light gently wraps around your item, highlighting craftsmanship without losing important details. If shadows fall in undesirable places, consider using a reflector—like a piece of white cardboard or a large sheet of paper—to bounce light back onto your work, filling in shadows softly. Additionally, understanding light quality can help you better harness the soft, natural illumination for more flattering images.
You don’t need fancy gear to get great results. Instead, focus on controlling the natural light around you. Use a window as your main light source, and if needed, supplement it with household items like white foam boards or reflective surfaces to manipulate the light. Keep your camera steady by propping it up on books or a stable surface, especially if you’re shooting handheld in low light. Make sure your camera settings are adjusted to accommodate the softer winter light—lower ISO to reduce grain, a wider aperture to let in more light, and a slower shutter speed if necessary—so your images come out crisp and true to life.
Ultimately, capturing the beauty of your handmade work with winter light is about patience and thoughtful composition. By paying attention to natural light’s qualities and applying simple composition tips, you’ll create warm, inviting photos that truly showcase your craftsmanship without needing fancy equipment.
natural light photography reflector
As an affiliate, we earn on qualifying purchases.
As an affiliate, we earn on qualifying purchases.
Frequently Asked Questions
How Can I Prevent Glare When Photographing Shiny Handmade Items?
To prevent glare when photographing shiny handmade items, focus on glare reduction and reflection control. Use diffused natural light, like soft winter sunlight, to minimize harsh reflections. Position your object at an angle, not directly facing the light source, and consider using a sheer cloth or paper to diffuse reflections. These techniques help you capture clear, glare-free images that showcase your work’s details beautifully.
What Are the Best Times of Day for Winter Natural Light Photography?
You should aim for the golden hour in winter, which occurs shortly after sunrise and before sunset. During this time, the light is warm and diffused, creating soft shadows that enhance your handmade work’s details. The gentle glow minimizes harsh glare and highlights textures beautifully. By capturing your photos during these hours, you’ll naturally benefit from the most flattering, cozy winter light, making your craft look its best.
How Do I Stabilize My Camera on Cold, Possibly Slippery Surfaces?
To stabilize your camera on cold, slippery surfaces, use a sturdy tripod to guarantee stability and prevent camera shake. Check the tripod’s stability by pressing down gently, and adjust the legs for a secure grip safety on uneven ground. If a tripod isn’t available, brace your camera against a solid object or hold it firmly with both hands, keeping your grip tight to avoid slips and blurry photos in winter conditions.
Can I Shoot Indoors Near Windows to Get Similar Winter Light Effects?
Sure, shooting indoors near windows can mimic winter light effects—if you’re okay with window reflections and trying not to get distracted by your own face in the glass. Use natural indoor lighting to highlight textures, and position your subject to avoid harsh reflections. You’ll find that soft, diffused light from windows creates cozy, beautiful images, proving you don’t need fancy gear to capture that winter glow indoors.
How Do I Handle Low-Light Conditions Without Using Extra Equipment?
You can handle low-light conditions by maximizing natural light and adjusting your camera settings. Position your subject near a window to harness soft, natural light, and avoid harsh shadows. Increase your ISO slightly to brighten the image without too much noise, and use a wider aperture to let in more light. Keep your shutter speed steady or use a tripod if needed. These steps help you capture clear, well-lit photos without extra equipment.
white foam board for photography
As an affiliate, we earn on qualifying purchases.
As an affiliate, we earn on qualifying purchases.
Conclusion
Just like Van Gogh captured the raw beauty of his starry nights, you can showcase your handmade creations in winter’s gentle glow. No fancy gear needed—trust in natural light and your eye for detail. Think of it as painting with shadows and sunlight, turning each shot into a masterpiece. With patience and a keen eye, you’ll reveal the true spirit of your work, making every photo a story as timeless as art itself.
handmade product photography backdrop
As an affiliate, we earn on qualifying purchases.
As an affiliate, we earn on qualifying purchases.
window light photography diffuser
As an affiliate, we earn on qualifying purchases.
As an affiliate, we earn on qualifying purchases.