To guarantee you can find your craft supplies a year later, start by grouping similar items and storing them in clear, stackable containers. Use durable, easy-to-read labels with descriptive names and detailed descriptions. Consider color-coding or including dates on supplies like glue or paint. Applying waterproof or laminated labels helps them last over time. Taking these steps now will save you frustration later; discover more tips to keep your workspace organized long-term.
Key Takeaways
- Use durable, waterproof labels with clear, bold fonts to prevent fading and ensure readability over time.
- Incorporate descriptive tags and detailed descriptions to easily identify supplies after months or years.
- Implement color coding or visual cues on labels for quick recognition of categories or types of supplies.
- Date perishable or inventory-sensitive items to track longevity and replenish as needed.
- Store supplies in clearly labeled, organized containers using consistent labeling techniques for easy retrieval later.

Labeling your craft supplies might seem like a small task, but it can considerably streamline your creative process. When you’re deep into a project, the last thing you want is wasting time digging through cluttered bins or guessing which container holds that specific ribbon or paint. Proper storage organization combined with effective labeling techniques lets you find what you need quickly and keeps your workspace tidy. By establishing a clear system now, you’ll save yourself hours of frustration months down the line, especially when you revisit your craft supplies after a year or more.
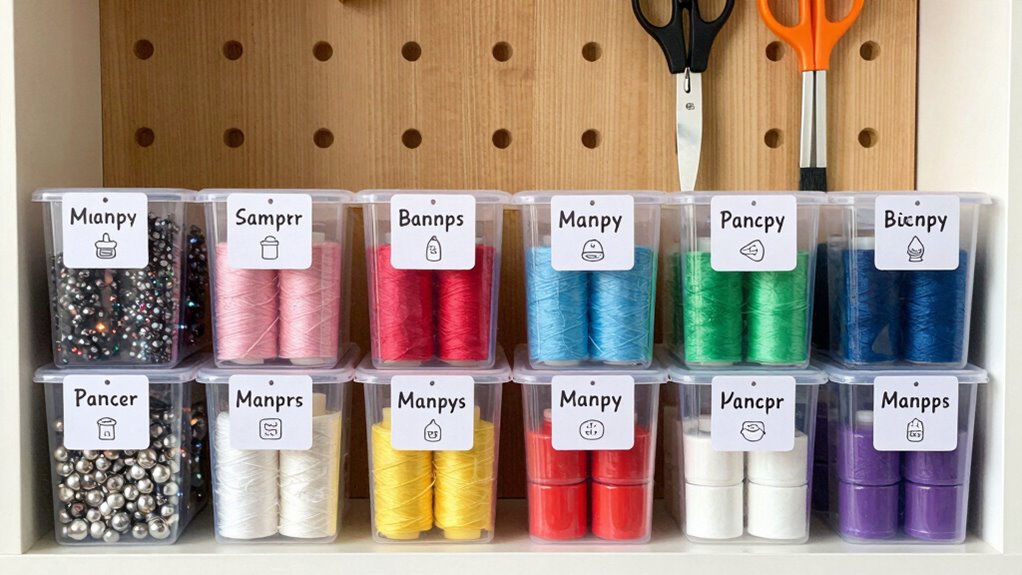
To start, think about the types of supplies you have and how you use them. Group similar items together—like beads, fabric scraps, or markers—and assign each group a designated storage container. Clear plastic bins or stackable drawers work well for storage organization because they allow you to see contents at a glance, but even these can become confusing without labels. Labeling each container with specific, descriptive tags helps you instantly identify the contents and prevents rummaging through multiple bins. When choosing labels, opt for waterproof or laminated options, especially if you store supplies in damp or fluctuating environments, so your labels don’t peel or fade over time.
Applying effective labeling techniques is essential for long-term clarity. Use bold, legible fonts and include detailed descriptions, such as “Metallic Yarn – Silver” or “Acrylic Paint – Red, 2 oz.” This detailed approach ensures that even if you’re away for months, you won’t have to guess what’s inside. You can also incorporate color coding—using colored labels or tape—to quickly distinguish between different categories or projects. For example, all fabric-related supplies could have blue labels, while paper supplies might be marked with yellow. This visual cue speeds up your ability to locate items and keeps your storage system intuitive.
Another helpful tip is to date your supplies when relevant, especially for perishable or limited-use items like glue or paint. This way, you’ll know when they were purchased or opened, helping you manage inventory and avoid using expired or dried-out supplies. When labeling, consider using a label maker for neatness or handwrite with a permanent marker if you prefer a personal touch. Just ensure your writing is clear and legible, as faded or messy labels defeat the purpose of organization.
Additionally, understanding the Gold IRA Markets can inspire you to think about long-term planning and investment, which parallels the importance of organizing your supplies efficiently for future use. In the end, the investment in proper storage organization and labeling techniques pays off. It transforms a cluttered, chaotic space into an efficient workshop where every supply is easy to find. When you revisit your craft supplies after a year, you’ll appreciate how quickly you can pick up right where you left off, without wasting time searching for that elusive glue stick or the perfect shade of thread. Good labeling habits make your creative process smoother, more enjoyable, and ultimately more productive.
waterproof craft labels
As an affiliate, we earn on qualifying purchases.
As an affiliate, we earn on qualifying purchases.
Frequently Asked Questions
What Are the Best Waterproof Labels for Craft Supplies?
For waterproof labels, you want ones with strong adhesive strength and durable label materials like vinyl or polyester. These materials resist water, tears, and fading, ensuring your craft supplies stay labeled over time. Look for labels specifically designed for outdoor or waterproof use. Apply them on clean, dry surfaces for the best adhesion. Brands like Avery and Brother offer reliable waterproof labels that stay secure, even in humid or wet conditions.
How Can I Prevent Labels From Peeling Over Time?
To prevent labels from peeling over time, think of your labels as a suit of armor for your supplies. Focus on choosing labels with high label durability and strong adhesive strength, ensuring they cling tightly through wear and tear. Apply the labels on clean, dry surfaces, and press firmly to activate the adhesive. For extra hold, consider sealing with a clear waterproof sealant, giving your labels a resilient shield.
Are There Eco-Friendly Labeling Options for Crafts?
You can choose eco-friendly labeling options like biodegradable markers, which write smoothly and break down naturally over time. For labels, look for those with recyclable adhesives that stick well but won’t harm the environment once removed or degraded. These options help you stay environmentally conscious while keeping your craft supplies organized. Plus, they’re safe for the planet and easy to update or replace as needed.
How Do I Organize Labels for Different Types of Supplies?
You should organize labels by using color coding to quickly identify different supply types and adjusting label size for each item’s container. For example, use small labels for jars and larger ones for bins, with distinct colors for paint, ribbons, or fabric. This system helps you find supplies faster, keeps your space tidy, and makes restocking easier. Keep a key or legend nearby to remember what each color and size represents.
Can I Reuse Labels on New Craft Projects?
You can definitely give labels a second life, but consider their durability and how gently you remove the adhesive. If your labels are sturdy and peel off cleanly, reuse them on new projects for convenience. However, if the adhesive leaves residue or the label wears out, it’s better to start fresh. Carefully removing labels helps you preserve their adhesive quality, ensuring they stick again without losing their charm or clarity.
clear plastic storage bins with labels
As an affiliate, we earn on qualifying purchases.
As an affiliate, we earn on qualifying purchases.
Conclusion
By labeling your craft supplies now, you’ll save yourself from a future full of “Where’s that glitter glue?” moments. Think of it as your personal time capsule—today’s effort guarantees tomorrow’s creativity flows smoothly. Don’t be a “tech-savvy” person in 2023 without organized supplies; even Marie Kondo would agree that clarity and order spark joy. So, take a few minutes now, and your future self will thank you for not turning into a craft version of a lost time traveler.
laminated label maker for craft supplies
As an affiliate, we earn on qualifying purchases.
As an affiliate, we earn on qualifying purchases.
color-coded craft supply labels
As an affiliate, we earn on qualifying purchases.
As an affiliate, we earn on qualifying purchases.