If your handmade bows look “sad,” it’s often due to uneven fabric tension and lack of symmetry. When loops are uneven or fabric is loose, the bow appears limp and unbalanced. Keep the tension consistent, gently adjusting as you shape the loops to create a fuller, lively look. By mastering these tension tricks, you can achieve polished, cheerful bows—on the edge of a simple shaping technique that makes all the difference.
Key Takeaways
- Uneven or loose fabric tension causes unstructured, floppy loops that look sad and unpolished.
- Overly tight fabric distorts the bow, making it stiff and less lively.
- Inconsistent tension between loops results in asymmetry, giving the bow a droopy, sad appearance.
- Using fabric that lacks enough tension or structure can prevent the bow from holding a full shape.
- Gently adjusting and balancing tension before and after tying creates symmetrical, lively, and polished bows.
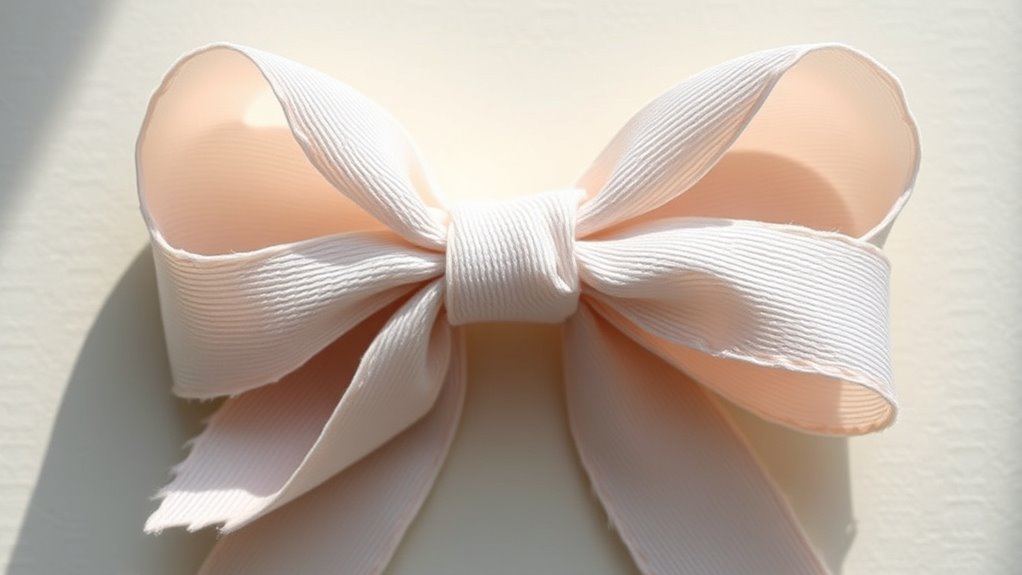
If you want to achieve perfectly shaped handmade bows, mastering a simple yet effective shaping trick can make all the difference. One common reason bows look ‘sad’ or lack the polished appearance you desire is uneven bow symmetry. When your bow isn’t symmetrical, it can appear off-balance and less appealing. The key to fixing this lies in managing fabric tension properly during the shaping process. If the fabric is too loose, the bow’s loops won’t hold their form, making it look floppy or uneven. Conversely, if it’s too tight, the bow can become distorted or stiff, losing its natural, graceful shape.
To start, focus on creating balanced loops on both sides of your bow. Before tying, gently pull on the fabric to adjust tension evenly across both sides. This ensures that neither side is overly tight or loose. When you form the loops, keep tension consistent; this helps maintain symmetry and prevents one side from collapsing or looking uneven. As you tighten the center, do so gradually and check that the loops mirror each other. Holding the fabric taut but not overstretched will give your bow a neat, professional look.
Create balanced loops by gently adjusting tension before tying for a polished, symmetrical bow.
Another trick is to pay attention to the fabric’s natural tension. Different fabrics respond differently—silk and satin need less tension to hold their shape, while stiffer materials like grosgrain require a bit more. If your fabric is too slack, your bow will lack structure and appear sad or limp. If it’s too tight, it might look stiff or even distort the shape. To get it just right, test the tension as you go along by gently pulling the fabric before tying the knot. You want a firm, controlled tension that allows the bow to hold its shape without wrinkling or collapsing. Choosing the right fabric for your project can greatly influence how well your bow holds its shape and how easy it is to work with.
Additionally, understanding the fabric type you’re working with can greatly improve your results, as different materials respond uniquely to tension adjustments. Practicing this shaping trick involves a bit of finesse. After tying your bow, gently adjust the loops, pulling slightly to tighten or loosen as needed. This fine-tuning ensures that the bow remains symmetrical and maintains a lively, full appearance. When you master controlling fabric tension and focusing on bow symmetry, your handmade bows will look polished and appealing every time. Remember, consistency is key—by paying close attention to how much tension you apply and always aiming for symmetrical loops, you’ll avoid the ‘sad’ look and achieve bows that are lively, balanced, and beautifully shaped.
Frequently Asked Questions
Can Different Ribbon Materials Affect the Bow’s Shape?
Yes, different ribbon materials definitely affect the bow’s shape. Ribbon textures like satin, grosgrain, or velvet create varied material effects that influence how well a bow holds its form. Smooth or stiffer ribbons tend to stay more structured, while softer or more flexible textures may look more relaxed or even sad. Choosing the right material based on texture and stiffness helps you craft bows that look lively and well-shaped.
How Do I Choose the Right Bow Size for My Project?
Choosing the right bow size is like finding the perfect dance partner—proportional sizing guarantees visual harmony. You’ll want a bow that complements your project’s scale; too big, and it overwhelms, too small, and it gets lost. Measure your item carefully, and opt for a bow that balances with the overall design. This way, your handmade creation will look polished and cohesive, drawing attention without stealing the show.
Is There a Specific Technique for Tying Perfect Bows?
To tie perfect bows, you should focus on consistent knot tightness and ribbon texture. Start by making a snug knot, then create even loops, adjusting the tightness to avoid a saggy or stiff look. Use softer ribbons for a more natural shape, and gently tighten or loosen as needed. Practice helps you find the right balance, ensuring your bows look polished and professional every time.
How Long Does the Shaping Trick Last?
The shaping trick typically lasts for about 24 to 48 hours, depending on the materials and handling. You’ll find that the bow’s shaping durability is influenced by how gentle you are after shaping and the type of fabric used. To maximize bow longevity, avoid excessive touching or bending, and store it properly. With proper care, your handmade bow can keep its shape beautifully for days or even weeks.
Can This Trick Be Used for Other Craft Projects?
Yes, you can use this shaping trick for other craft projects. It works well with various ribbon textures, helping you achieve a polished look. Just keep in mind that proper shaping can enhance craft durability, ensuring your project stays intact longer. Whether you’re making bows, trims, or embellishments, this trick provides a simple way to improve your results and give your crafts a professional finish.
Conclusion
So, next time your handmade bow looks a bit sad, remember it’s just a simple shaping trick away from perfection. Think of it like a bad hair day—you just need a little tweak to make everything look lively again. With this easy trick, your bows will go from flat and forlorn to full of charm, proving that even the smallest adjustments can turn a simple craft into a stunning detail. Now, go give your bows a little extra love!