Your projects can look messy when your edge finishing is inconsistent. Variations in materials, such as thickness or grain, cause uneven adhesion and rough edges. Using the wrong techniques or rushing through steps can lead to jagged, patchy results. Without a systematic approach, each step isn’t controlled, making edges look unprofessional. Paying attention to material quality, mastering proper methods, and following a clear process will help you achieve cleaner, more polished finishes—you’ll discover more tips as you continue.
Key Takeaways
- Inconsistent material quality leads to uneven edges and poor finishing results.
- Using incorrect or improper techniques causes jagged, rough, or unprofessional edges.
- Lack of systematic approach and rushing can create messy, uneven, and unpolished finishes.
- Ignoring scientific principles about material responses results in unpredictable and flawed edges.
- Insufficient attention to detail and material prep hampers achieving sleek, polished project edges.

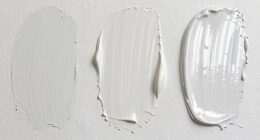
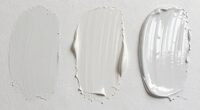
The edge-finishing problem occurs when the process of smoothing or sealing the edges of a material fails to produce a clean, uniform result. This common issue can make your entire project look unprofessional and messy, but understanding the root causes helps you fix it. One major factor is material consistency. When the materials you’re working with vary in thickness, texture, or quality, it becomes challenging to achieve smooth, even edges. For example, if you’re working with wood, slight differences in grain or moisture content can cause finishing techniques to behave unpredictably. Similarly, inconsistent batches of materials can lead to uneven adhesion or sealing, making your edge-finishing look rough or patchy instead of sleek and seamless. Recognizing the importance of material consistency means paying close attention to the quality and uniformity of your supplies before you start. Incorporating sound scientific principles into your approach can also improve your results by understanding how different materials respond to finishing methods.
Material consistency is key to achieving smooth, professional edge finishes.
Another key aspect impacting your edge finish is the choice and application of finishing techniques. Not all techniques work equally well on every material, and using the wrong method can amplify imperfections. For instance, trying to sand or seal a surface with a technique suited for a different material can result in uneven edges or visible flaws. Proper finishing techniques involve more than just the right tools; they require understanding the specific properties of your material and applying the correct method. This might include using fine-grit sandpaper for smoothing, applying sealants evenly with a brush or roller, or employing edge banding for a clean, professional look. If you rush through these steps or skip essential prep work, you’re likely to end up with edges that look jagged, uneven, or poorly sealed.
Your approach to finishing can also influence how well the edges hold up over time. For example, applying too much sealant at once can cause drips or uneven coverage, while too little might leave gaps that trap dirt or moisture. Learning to control your application and follow recommended drying times ensures that your edges are both functional and visually appealing. Additionally, technique consistency is vital; if you switch methods mid-project or don’t follow a systematic process, you risk creating a patchwork appearance that looks unrefined.
Ultimately, solving the edge-finishing problem involves paying close attention to material consistency and mastering appropriate finishing techniques. By selecting uniform materials and applying finishing methods carefully and systematically, you’ll improve the overall look of your projects. The difference between a rough, messy edge and a sleek, professional finish often comes down to these details. When you focus on understanding your materials and honing your finishing skills, you’ll find that your projects look cleaner, more polished, and more impressive.
Frequently Asked Questions
How Can I Identify if My Project Has an Edge-Finishing Problem?
You can identify if your project has an edge-finishing problem through visual inspection. Look closely for rough edges, uneven borders, or frayed areas, which indicate poor edge finishing. If you notice these imperfections, it’s a sign that your project needs better finishing techniques. Addressing these issues promptly guarantees a cleaner, more professional appearance and prevents further damage or deterioration over time.
What Tools Are Best for Improving Edge Finishing?
Think of your project like a sculpture—you want smooth, clean edges. Use quality edge tape to seal and protect, ensuring a neat finish. Sanders with fine grit help smooth rough spots and perfect curves. I once fixed a countertop with this combo, and the difference was striking. The right tools, like precise sanding tools and reliable edge tape, make your edges crisp, professional, and flawless.
How Does Poor Edge Finishing Affect Overall Project Durability?
Poor edge finishing directly impacts your project’s durability by compromising material adhesion and surface smoothness. When edges aren’t properly finished, moisture and debris can seep in, weakening the structure over time. Additionally, rough or uneven edges cause stress points, increasing the risk of cracking or chipping. This reduces your project’s lifespan and aesthetic appeal, making it essential to guarantee precise edge finishing for long-lasting, resilient results.
Are There Specific Materials More Prone to Edge-Finishing Issues?
Certain materials, like laminate edges and veneer finishing, are more prone to edge-finishing issues. You’ll notice laminate edges often chip or peel if not properly sealed or handled, while veneer finishing can crack or lift when exposed to moisture or improper sanding. To avoid messiness, you should focus on precise application, proper sealing, and choosing high-quality materials suited for your project’s conditions.
What Are Quick Fixes for Edge-Finishing Mistakes?
To fix edge-finishing mistakes quickly, apply some edge tape over uneven edges for a cleaner look. Use finishing techniques like sanding or trimming rough spots before taping to smooth out imperfections. If edges are chipped or frayed, re-glue or reapply edge tape, pressing firmly to guarantee adhesion. These simple steps improve your project’s appearance fast, saving you time and effort while achieving a professional finish.
Conclusion
Think of your project as a finely woven tapestry. When edges are left unfinished, it’s like frayed threads unraveling the whole picture, spoiling its beauty. But when you finish those edges with care, each strand stays in place, creating a sturdy, cohesive masterpiece. By paying attention to edge-finishing, you prevent chaos from creeping in, ensuring your project remains a vivid, polished work of art—strong, seamless, and truly impressive.