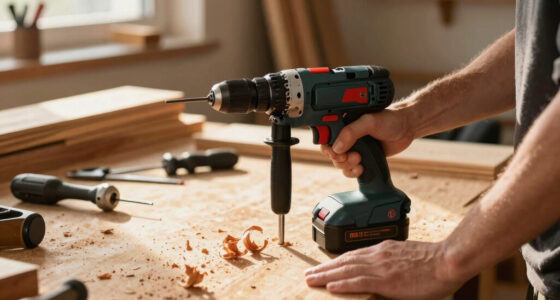

This guide walks you through using a cordless drill for the two tasks it performs in woodworking: drilling holes and driving screws. By the end, you will be able to select the correct bit, set the drill’s clutch and speed, drill straight pilot holes, and drive screws flush without splitting the wood or stripping the screw head. This guide is written for beginners — no prior drill experience is assumed — and covers the drilling and driving portion of common projects like shelves, boxes, jigs, and furniture assembly. Expect to spend 20 to 40 minutes practicing the steps on scrap wood before applying them to real work.

Get business pricing on tools and workshop supplies
- Business-only prices and quantity discounts
- Tax-exempt purchasing
- Multiple users, one account, clear invoices
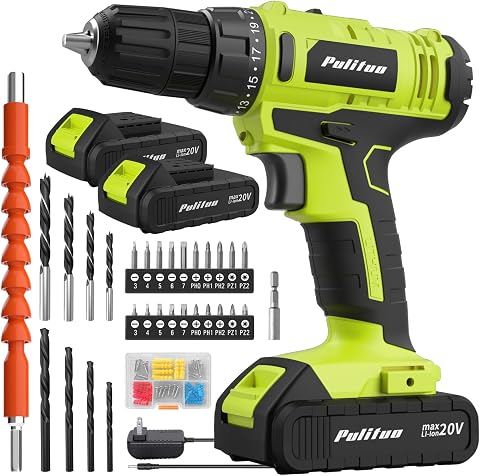
PULITUO 20V Cordless Drill/Driver Kit
- ✔ Voltage: 20V
- ✔ Batteries: 2 x 1.5Ah lithium-ion
- ✔ Speed range: 0–400 / 0–1500 RPM

BLACK+DECKER 20V MAX Cordless Drill Driver Kit with 100-Piece Accessory Set
- ✔ Voltage: 20V MAX
- ✔ Battery: 1.5Ah lithium-ion
- ✔ Max speed: 650 RPM

DEKOPRO 20V Cordless Drill Set with Battery and Charger
- ✔ Voltage: 20V
- ✔ Battery: 1.5Ah lithium-ion (single)
- ✔ Speed range: 0–350 / 0–1350 RPM
Difficulty: Beginner | Time: 20-40 minutes to learn; applied on every project
What You’ll Need
Tools & Materials:
- A cordless drill (any modern 12V or 18V/20V drill)
- A charged battery and, ideally, a spare
- A set of brad-point or twist drill bits (common sizes: 1/16 in to 1/2 in)
- A driver bit set ( Phillips #1 and #2, square/Robertson, Torx if your screws require them)
- Wood screws appropriate for your project
- A scrap board of the same wood species and thickness as your project for test holes
- A tape measure, pencil, and combination square for marking
- Safety glasses
- A clamp or vise to hold the workpiece
Knowledge:
- Basic ability to read a tape measure and mark wood
- Familiarity with the drill’s parts: chuck, trigger, direction switch, clutch ring, speed selector (review your owner’s manual if not)
Charge the battery fully before starting — a half-charged battery causes weak drilling and stripped screws. Clear a stable work surface with good lighting, and put on safety glasses before the drill leaves the case. Wood chips fly.
PULITUO 20V Cordless Drill/Driver Kit
This is the pick that makes the most sense for someone whose drill will actually live in the woodworking shop rather than the junk drawer. The standout feature isn’t the motor — it’s the second battery in the box. Anyone who has assembled a cabinet carcass knows the frustration of a drill dying mid-glue-up, and with two 1.5Ah packs you can keep one on the charger permanently. Neither the DEKOPRO nor the BLACK+DECKER offers this.Capability-wise, the PULITUO also leads the group where it counts for woodworking: 266 in-lb of torque, roughly 77% more than the BLACK+DECKER’s 150 in-lb rating. In practice that means driving 3-inch screws into hardwood is a realistic task rather than a motor-straining struggle. The 21+1 clutch offers finer torque control than the DEKOPRO’s 18+1, which matters when you’re setting brass hinges screws in soft pine without camming out the head.The kit’s flexible shaft is a genuinely woodworking-relevant accessory — it lets you drive screws in cramped cabinet interiors where a full drill body won’t fit, something neither competing kit includes. The 3/8-inch chuck is the same class as its rivals, so large Forstner-style bits are off the table for all three. The tradeoff: top speed of 1500 rpm and the 1.5Ah batteries still put a ceiling on heavy-duty work, and the accessories are budget-grade — expect to replace the bits with quality ones as you progress.
Pros:
- Two batteries included, effectively doubling work time during long sessions
- Highest torque of the group at 266 in-lb, best for driving into hardwood
- 21+1 clutch gives finer control for delicate screw-setting
- Flexible shaft reaches tight spots inside cabinets and boxes
Cons:
- Maximum speed and torque still limit heavy-duty applications
- 1.5Ah batteries drain quickly under sustained high-load drilling
- Budget-grade included bits will need upgrading for serious work
Best for: Hobbyist woodworkers who want the most capable drill and the longest effective runtime per dollar, especially anyone doing furniture assembly and cabinetry work.
Not ideal for: Builders who need to bore large-diameter holes in dense hardwood regularly — the torque and chuck size will frustrate, and a pro-grade platform is the better investment.
Bottom line: The most complete package for the money and the only one designed with the long woodworking session in mind.
“The most complete package for the money and the only one designed with the long woodworking session in mind.”
BLACK+DECKER 20V MAX Cordless Drill Driver Kit with 100-Piece Accessory Set
Where the PULITUO wins on drill capability, the BLACK+DECKER wins on ecosystem and out-of-box readiness. For a first-time woodworker, the 100-piece accessory set means you’re not making a second shopping trip for driver bits, drill bits, or miscellaneous hardware before your first project — a convenience neither rival matches. Add the zippered case and you have a complete starter workshop in one box.The POWERCONNECT battery platform is the quiet differentiator here. Unlike the DEKOPRO and PULITUO, whose batteries only fit their own kits, this battery swaps into a wide family of BLACK+DECKER tools. If your woodworking habit grows into wanting a jigsaw, sander, or trim saw, you’re buying bare tools instead of whole new systems — a genuine long-term money saver.The compromises are real, though. At 150 in-lb of torque, this is the weakest drill of the three, and its 650 rpm top speed is dramatically slower than the PULITUO’s 1500 rpm. That translates into slower drilling and more strain when driving long screws into hardwood. The 24-position clutch is the most granular of the group, which partially compensates by protecting softwood workpieces from overdriving. At 6.1 lb shipped weight with case and accessories, it’s also the heaviest package here — fine for bench work, tiring for overhead tasks where the 2.5 lb DEKOPRO shines.
Pros:
- 100-piece accessory set covers nearly every starter project need
- POWERCONNECT battery compatible with a wide family of future tools
- 24-position clutch, the most precise of the three, protects soft workpieces
- Zippered case keeps everything organized in a small shop
Cons:
- Lowest torque of the group at 150 in-lb
- Top speed of 650 rpm is the slowest here by a wide margin
- Heaviest package at 6.1 lb; tiring for extended overhead use
Best for: Beginners assembling their first tool collection who value a complete accessory set and a battery platform that grows with them.
Not ideal for: Woodworkers who regularly drive large or long screws into hardwoods — the torque deficit compared with the PULITUO will be noticeable immediately.
Bottom line: The smartest starting point for a total beginner, provided torque-hungry hardwood work isn’t on the immediate horizon.
“The smartest starting point for a total beginner, provided torque-hungry hardwood work isn’t on the immediate horizon.”
DEKOPRO 20V Cordless Drill Set with Battery and Charger
Sometimes the best drill for woodworking is simply the one you don’t mind holding for an hour. At 2.5 lb, the DEKOPRO is dramatically lighter than the BLACK+DECKER package and noticeably more nimble than the PULITUO, which makes it the pick for repetitive tasks: installing shelf pins, driving a run of pocket screws, or working overhead on an upper cabinet install. Fatigue is a real factor in fine woodworking, and a light drill with decent balance helps keep holes straight and consistent.Its 1350 rpm top speed beats the BLACK+DECKER’s 650 rpm comfortably and trails only the PULITUO, which makes it quick for clean through-holes in softer woods where speed matters more than brute torque. The 18+1 clutch sits between its rivals in granularity — adequate for pine and plywood, slightly coarser than we’d like for ultra-delicate brass hardware compared with the PULITUO’s 21+1 or BLACK+DECKER’s 24 positions.The honest tradeoff is twofold. First, you get only one battery, and at 1.5Ah it’s the same small capacity as everyone else’s — meaning downtime mid-project unless you buy a spare. Second, the accessory bundle is the thinnest of the three kits, closer to a starter sampling than a usable collection. Compared with the PULITUO, you’re giving up the second battery, the flexible shaft, and roughly comparable capability for a lighter frame; compared with the BLACK+DECKER, you’re trading the huge accessory set and battery ecosystem for agility. That trade is worth it only if weight and handling are your top priorities.
Pros:
- Featherweight 2.5 lb body reduces fatigue in precision and overhead work
- 1350 rpm top speed drills clean holes quickly in softer woods
- Compact form factor fits tight spaces between workpieces
- Includes essentials: battery, charger, and a starter bit selection
Cons:
- Only one battery included, forcing mid-project charging breaks
- Smallest accessory bundle of the three kits
- Torque rating is unlisted, suggesting modest heavy-duty capability
Best for: Woodworkers prioritizing lightweight handling for repetitive, precision-oriented tasks like shelf-pin drilling, hardware installs, and overhead cabinet work.
Not ideal for: Anyone planning marathon build sessions — the single 1.5Ah battery means forced breaks, and the minimal accessory bundle leaves you shopping for bits anyway.
Bottom line: The right drill when handling and weight matter more than kit contents — just budget for a second battery.
“The right drill when handling and weight matter more than kit contents — just budget for a second battery.”
As an Amazon Associate we earn from qualifying purchases.
Before You Start
Safety and setup notes: Never hold a workpiece with your hand while drilling into it. Clamp the wood to a bench or sawhorse every time — a spinning bit can catch and spin the board violently. Remove rings, watches, and loose sleeves. If your drill has a side handle for high-torque work, attach it. Finally, always check what is behind or below your workpiece: drill strokes and through-holes will damage a benchtop, so place a sacrificial board underneath.
Learn the two-mode setup before you begin. Most cordless drills have a clutch ring numbered 1 through 10+ and a two-speed gearbox. Low speed with high clutch numbers is for driving screws; high speed with the clutch set to drill mode (the drill icon or highest number) is for making holes. Mixing these up is the most common beginner error.
Step-by-Step Instructions
Step 1: Clamp the workpiece and mark your hole locations
Measure and mark each hole location with a pencil, then check the marks with a combination square to confirm they are aligned where you intend. Press a small starter divot into each mark with an awl or a nail — the point gives the drill bit something to bite so it does not wander. Clamp the board to your workbench so the marked area is fully supported.
Tip: If you are drilling a through-hole, place a scrap board under the workpiece. This prevents tear-out (splintered wood) on the exit side and protects your bench.
Check: Each pencil mark has a visible divot, and the board does not move when you push on it by hand.
Step 2: Select and install the correct bit
Choose the bit: for drilling, select a brad-point or twist bit sized correctly for your purpose (see Step 4 for sizing); for driving, pick a driver bit that matches your screw head exactly — #2 Phillips fits most common wood screws. Insert the bit: hold the chuck, pull the trigger briefly while rotating the chuck collar counterclockwise to open the jaws, slide the bit in fully, then tighten by hand and give the trigger a brief pull while holding the collar until the jaws grip firmly. If your drill has keyless ratcheting action, hand-tighten until it clicks snugly.
Tip: A wrong-size driver bit is the number one cause of stripped screw heads. The bit should sit snugly in the screw recess with no wobble. If your screws came with a square or Torx drive, use it — these cam out far less than Phillips.
Check: The bit is centered in the chuck and does not wobble when you spin the drill briefly. A quick hand tug cannot pull the bit out.
Step 3: Set speed, clutch, and direction
Set the gearbox and clutch: for drilling holes, move the gearbox to high speed (2) and rotate the clutch ring to the drill mode icon or its highest setting; for driving screws, move the gearbox to low speed (1) and set the clutch around the middle of its range (setting 4 or 5 on a 10-scale drill). Slide the direction switch to forward, and push it to the center lock position whenever you set the drill down or change bits.
Tip: The clutch is your protection against overdriving. When the screw reaches its seat, a lower clutch setting makes the chuck slip instead of burying the screw or splitting the wood. You will adjust this by feel in Step 6.
Check: The drill spins clockwise in forward when you pull the trigger, and the speed selector is in the position you intended.
Step 4: Drill a pilot hole (for screws) or full-size hole
Select a pilot bit roughly equal to the diameter of the screw’s solid shaft, not the threads: hold the bit in front of the screw — the threads should stand slightly proud of the bit. Place the bit tip in the divot, position the drill perpendicular to the wood (90 degrees both side-to-side and front-to-back), and squeeze the trigger smoothly to full speed. Apply steady, moderate pressure and let the bit cut rather than forcing it. Stop drilling when you reach the screw’s depth plus a small amount. For a clean finish on show faces, drill a shallow countersink or counterbore so the screw head sits flush or below the surface.
For plain holes (dowels, hardware, pass-throughs): follow the same technique, but pull the bit back every inch or so to clear wood chips, especially in deeper holes. Withdraw the bit while it is still spinning for a cleaner hole.
Tip: Sight down the drill from two angles (side and top) at the start of each hole to confirm it is square, or use a small drilling guide block. Tilting the drill produces angled holes that misalign joints.
Check: The hole walls are clean, the exit side shows little to no tear-out, and a test screw threads in with firm but easy resistance.
Step 5: Switch bits and drive the screw
Push the direction switch to the center lock, swap in your driver bit, and flip the switch to forward. Place the screw on the bit and hold it against the pilot hole. Start the trigger slowly — a slow start keeps the screw from jumping out of the recess. Increase to full speed once the screw is engaged and standing straight, applying steady pressure that pushes the screw into the wood. Ease off the trigger as the head approaches the surface.
Tip: Keep firm, straight pressure along the screw’s axis. Letting the drill tilt or bounce is what rounds out screw heads. If you hear rapid clicking, the clutch is slipping — that is normal once the screw is seated.
Check: The screw sits flush with the surface or in the countersink, the head recess shows no damage, and the surrounding wood has not cracked.
Step 6: Adjust the clutch and drive the remaining screws
Inspect your first screw. Increase the clutch one or two settings and drive the next screw if the first screw did not reach full depth before the clutch slipped. Decrease the setting if the screw buried itself too deep or the wood started to dimple or split. Lock in that clutch number once one screw comes out exactly right, and drive the remaining screws the same way. For hardwoods like oak or maple, expect to need a higher clutch setting or a slightly larger pilot hole than for pine.
Tip: Drill one or two test screws into your scrap board before touching the actual project, especially when working with hardwood or near a board’s end.
Check: All screws are driven to consistent depth with intact heads and no splitting.
Step 7: Remove the bit and store the drill
Push the direction switch to the center lock, open the chuck as in Step 2, and pull the bit out and return it to its case. Remove the battery if you are done for the day, and place it on the charger so the drill is ready next time. Wipe wood dust off the drill’s vents with a dry cloth — clogged vents overheat the motor.
Check: The drill is clean, the battery is charging or stored off the drill, and bits are back in their labeled slots.
Common Mistakes to Avoid
- Skipping the pilot hole, especially near board ends — Always drill a pilot hole for screws larger than about 1 1/4 inches or whenever you are within 2 inches of a board’s end grain. Screws are wedges: without a pilot hole, they split wood along the grain.
- Using a pilot bit sized to the threads instead of the shaft — Match the bit to the solid inner shaft of the screw, so the threads still grip but the core does not force the wood apart. If the screw threads in with zero resistance, the pilot is too large.
- Drilling or driving at full speed from a dead stop — Ease into the trigger. Full-speed starts make bits wander off the mark and driver bits cam out of screw heads before the screw engages.
- Holding the workpiece by hand — Clamp every piece. A spinning bit that catches can spin the board around and strike your hand or wrist before you can release the trigger.
Troubleshooting
Problem: The bit wanders or skips off the pencil mark at the start of the hole
Solution: Press a starter divot with an awl or nail first. If the bit still walks, start at low speed until the bit is fully engaged, then increase speed.
Problem: The screw head strips out and the bit spins uselessly
Solution: Stop immediately — more spinning makes it worse. Remove the bit, grip the screw head with a pair of locking pliers or a screw extractor, and back it out. Prevent recurrence by pressing harder along the screw’s axis, driving slower, and confirming the bit size matches the screw.
Problem: The wood splits when the screw goes in
Solution: Back the screw out, drill a larger or deeper pilot hole at that location, and drive a new screw slightly offset from the split. If the split is in a visible face, a drop of wood glue and clamp pressure can close it. Prevent it by always piloting near end grain and in hardwoods.
Problem: The drill labors, stalls, or the battery dies quickly
Solution: For large-diameter holes (over 3/8 inch), switch to low speed, which delivers more torque. Withdraw the bit often to clear chips. If the battery is warm and weak, swap to the charged spare and recharge the first one.
What Success Looks Like
You have completed this task correctly when: every screw in your test piece and project sits flush or in its countersink with an undamaged head; no board shows splitting or cracking; drilled holes are straight, clean on both faces, and sized correctly (a test screw threads in firmly; a dowel or bolt fits snugly); and you reached the final screws without stripping anything or adjusting technique mid-way. As a benchmark, drive five screws into a scrap board — if all five come out consistent on the first attempt, you have the settings and technique dialed in.
Next Steps
With basic drilling and driving solid, expand into skills that multiply what your drill can do: pick up a spade bit or hole saw for large holes (door knobs, cable pass-throughs), a Forstner bit for flat-bottomed holes and hinges, and a pocket-hole jig for strong hidden screw joints. Buy a small drill press vise or portable drilling guide if you need perfectly perpendicular holes in precise locations. Maintain your drill by brushing dust from the vents monthly, keeping batteries at room temperature, and recharging before they are fully depleted. If you move into larger projects and find yourself drilling many repetitive holes, a dedicated benchtop drill press will be faster and more accurate than any handheld tool.
Frequently Asked Questions
Do I need an 18V drill or is 12V enough for woodworking?
A 12V drill handles most woodworking tasks — pilot holes, driving screws up to 3 inches, and holes up to about 1/2 inch in softwood. An 18V/20V drill is worthwhile for large spade bits, hole saws, long lag screws, and dense hardwoods. For a first drill doing typical projects, 12V is lighter and easier to control, which improves accuracy.
How do I know what pilot hole size to use without a chart?
Hold the drill bit in front of the screw. The bit should hide the screw’s solid shaft but stay narrower than the outer thread points. Test by driving a screw into scrap: it should require firm effort but not fight you. Too easy means the pilot is oversized; splitting or extreme resistance means it is too small.
Why does my screw keep going in crooked?
Two causes: the pilot hole is angled, or the drill tilts while driving. Confirm the drill is square to the wood from two viewing angles when starting the pilot hole, and keep your wrist straight and pressure along the screw’s axis while driving. Slow trigger speed at the start also helps the screw follow the pilot hole.
Should I use Phillips, square, or Torx screws?
Use Torx or square-drive screws whenever you have the choice. Their bits lock into the recess and almost never cam out or strip. Phillips heads are designed to cam out at high torque, which is why they strip more often with a powerful drill.
Can I use my drill as an impact driver?
For most woodworking, yes — a drill with an adjusted clutch drives wood screws fine. An impact driver adds rotational hammering for long screws, lag bolts, and dense hardwood, and it is harder on small screws and less precise for delicate work. Start with a drill; add an impact driver later if you regularly drive long or large fasteners.
Halloween Picks
halloween
As an affiliate, we earn on qualifying purchases.