This checklist is for woodworkers looking to plan a shop upgrade around dust collection, routing, drilling, clamping, sanding, and angle measurement. Use it to identify the areas that matter most for your projects and workspace.

Get business pricing on tools and workshop supplies
- Business-only prices and quantity discounts
- Tax-exempt purchasing
- Multiple users, one account, clear invoices
The sections are organized by shop function, with one pick in each category. Each includes buying considerations, practical points to check, and a short verdict to help you compare the role of each item.
Start with the tasks you do most often, then check fit and compatibility with your tools, workpieces, and available space. Treat the list as a planning aid: confirm dimensions, included components, and connection requirements before buying.
Dust Collection System
A dust collector can be a central part of a woodworking shop setup, so first consider where it will sit and which machines you want it to serve. The listed pick is the JET Vortex Cone Dust Collector with a 2-micron canister filter and 1.5 HP motor. Check the product details for its footprint, inlet size, electrical requirements, and any ducting or adapters you may need; the product name alone does not establish those fit details. A common mistake is choosing a collector without mapping the shop connections first. List the machines you intend to connect, note their outlet sizes, and plan the hose or duct route before settling on a location. Also consider access for filter care and collection-bag changes, and verify that the unit’s requirements suit your workspace. If you expect to move the collector between tools, account for hose reach and the path around benches and stored materials. Match the setup to your actual shop layout rather than assuming one configuration will suit every machine.What to look for:
- Confirm the collector’s footprint and placement clearance.
- Check inlet size against your machines and planned ducting.
- Verify electrical requirements for your workspace.
- Confirm which hoses, adapters, and duct components are included.
- Plan access for filter maintenance and collection changes.
JET Vortex Cone Dust Collector with 2-Micron Canister Filter, 1.5 HP, 115/230V (
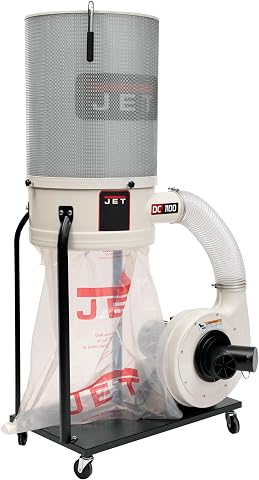
This JET dust collector features exclusive Vortex Cone technology to improve chip separation and prevent filter clogging. It includes a high-efficiency 2-micron canister filter, a durable 1.5 HP motor, and four casters for easy mobility in workshops and garages.
Pros:
- Vortex Cone technology improves chip separation and prevents filter clogging
- High-efficiency 2-micron canister filter ensures superior air quality
- Includes four casters for easy maneuverability in the shop
- Durable, permanently-lubricated motor rated for continuous duty
Cons:
- 80 dB noise level may be loud for some users
- Requires electrical connection (not cordless)
Best for: Woodworkers planning a dedicated dust-collection setup.
Not ideal for: Shops that have not yet checked space or connection needs.
Bottom line: Confirm placement, connections, and included components before building the rest of the dust-collection plan.
Router Table
A router table is a useful slot to evaluate when your projects call for controlled, repeatable routing at a bench. The listed pick is the Router Table System with Micro Adjust Fence, RTS026. Before choosing it, check the table dimensions, fence adjustment range, and how the system works with your router. Those details determine whether it fits your tools and the kinds of workpieces you handle. A common buying mistake is focusing on the fence feature while overlooking mounting and clearance. Confirm the router’s base or mounting pattern, the table’s opening and plate details, and whether the system includes the hardware your setup needs. Think about the space required for infeed and outfeed support, especially for longer stock, and make sure the table can sit securely in your intended location. If you already own a router, use its model information when checking compatibility rather than relying on a general assumption. A little measuring up front can prevent a system that is awkward to mount or difficult to use in your shop.What to look for:
- Check table dimensions against available bench space.
- Verify router mounting and plate compatibility.
- Review fence adjustment and locking details.
- Confirm included hardware and any separately needed components.
- Allow room for workpiece support on both sides.
Router Table System with Micro Adjust Fence, RTS026

This router table system features a precise aluminum fence with micro-adjustment for accurate routing. It includes a durable 32" x 24" laminated tabletop, adjustable fence faces, and integrated dust collection, making it ideal for detailed woodworking tasks.
Pros:
- Precise micro-adjustment for accurate fence positioning
- Smooth fence travel with ergonomic one-hand adjustment
- Sturdy laminated tabletop for stability and durability
- Supports various accessories with universal T-tracks
Cons:
- Heavy weight may be difficult to move
- Requires separate purchase for dust collection accessories
Best for: Woodworkers who want a dedicated router-table station.
Not ideal for: Shops whose router or mounting details are still unknown.
Bottom line: Check router fit and workspace clearance before choosing a permanent table location.
Drill Press Vise
A drill press vise helps hold a workpiece in position while you work, making jaw size and opening central to the selection. The listed pick is a Wilton Low-Profile Drill Press Vise, named with a 6-inch jaw width and 6-inch jaw opening. Compare those dimensions with the stock you typically handle, and check the product details for its overall height and mounting arrangement. One easy mistake is treating jaw capacity as the only fit measure. A vise also needs to sit securely on the drill press table and leave suitable clearance beneath the chuck and bit. Check the table’s dimensions and slots, along with the vise’s base and any required mounting hardware. Consider the shape and thickness of your usual workpieces: a vise that accommodates one dimension may not suit every odd-shaped or oversized piece. Confirm the listed opening and width in the current product specifications, since the supplied product name ends with an incomplete dimension after “2-inch.” Planning around actual measurements helps you avoid a vise that obstructs the work or does not secure the stock you intend to drill.What to look for:
- Compare jaw width and opening with typical workpieces.
- Check overall height for chuck and bit clearance.
- Confirm the base fits the drill press table and slots.
- Verify mounting hardware and clamping method.
- Review the full product dimensions before buying.
Wilton Low-Profile Drill Press Vise, 6" Jaw Width, 6" Jaw Opening, 2" Jaw Depth

This Wilton drill press vise features a low-profile design for increased working space, with hardened V-grooved jaws suitable for holding round objects vertically and horizontally. Made from durable cast iron with hardened steel jaws, it is ideal for drilling, tapping, and reaming applications.
Pros:
- Low-profile design increases working space
- Hardened jaws provide durability and secure grip
- Suitable for various machining tasks
Cons:
- Limited to applications requiring a low-profile vise
- Heavy cast iron construction may be cumbersome to move
Best for: Woodworkers who need a drill-press vise sized to their stock.
Not ideal for: Those who have not checked table fit or overhead clearance.
Bottom line: Match the vise’s full dimensions to both your workpieces and drill press table.
Parallel Clamps
Parallel clamps are worth planning around the panels and assemblies you build. The listed pick is a 24-inch parallel-clamp two-pack. Consider whether that length suits the dimensions of your typical glue-ups, and whether two clamps provide enough points of pressure for the assemblies you make. The right count and spread depend on your project size and clamping approach. A frequent mistake is assuming a single pair will cover every panel width or assembly. Measure a representative project, including room for clamp heads and any cauls or spacers you use, then compare it with the clamp’s usable capacity. Check jaw depth and bar dimensions in the product details, and consider how you will support the work while tightening. For larger projects, think through how many clamps you need and whether additional lengths would be useful. Also verify that the pair is sold as described and that the product specifications match the required reach. Planning the clamp layout before glue-up helps keep the work aligned and reduces last-minute adjustments.What to look for:
- Compare the 24-inch length with common glue-up dimensions.
- Check usable capacity and jaw depth in the specifications.
- Decide whether two clamps provide enough pressure points.
- Allow for cauls, spacers, and clamp-head clearance.
- Plan additional lengths for larger assemblies if needed.
Parallel Clamps for Woodworking, 24-inch, 2-Pack

These heavy-duty parallel clamps feature a 4-way pressure design with parallelogram couplers, ensuring flat panels and flush joints in woodworking projects. Fully adjustable to accommodate panels up to 24 inches wide and 3 inches thick, they are built from durable steel with a powder-coat finish for longevity.
Pros:
- Innovative 4-way pressure for even clamping
- Fully adjustable for various project sizes
- Durable construction with rust-resistant finish
- Includes two clamps for efficient workflow
Cons:
- May be heavier than standard clamps
- Adjustments require manual setup
Best for: Woodworkers whose projects fit within the clamps’ verified capacity.
Not ideal for: Large panel builders who need more reach or clamp points.
Bottom line: Measure a typical assembly and plan clamp quantity before relying on one pair.
Random Orbital Sander
A random orbital sander can fill a regular surface-preparation role, so consider how it fits your existing tool setup and sanding routine. The listed pick is the DEWALT 20V MAX XR 5-inch Random Orbital Sander, model DCW211B. Its product name identifies a 5-inch sanding format and a 20V MAX platform; check the current listing for what is included and for compatibility with your batteries and charger. A common mistake is assuming a bare-tool listing includes the battery, charger, or sanding supplies you need. Confirm the package contents and check that your existing battery platform matches. Then verify disc size and attachment style against the abrasives you use, and consider whether the sander’s grip and dust-collection connection suit your work habits. If you will connect it to a shop dust system or use an attached collection component, check the connector details before buying adapters. Match the tool to your normal workpiece size and sanding tasks, and make sure replacement discs are readily available in the format specified by the product.What to look for:
- Confirm whether a battery and charger are included.
- Check compatibility with your existing 20V MAX batteries.
- Match 5-inch discs and attachment style to available abrasives.
- Review dust-collection connection details for your setup.
- Consider grip and access for the surfaces you sand.
DEWALT 20V MAX XR 5-inch Random Orbital Sander (DCW211B)

The DEWALT 20V MAX XR 5-inch random orbital sander offers professional-level control, fast material removal, and low vibration for comfortable use. It features variable speed settings, dust collection, and compatibility with DEWALT dust extractors, making it ideal for woodworking and detailed sanding tasks.
Pros:
- High performance with fast material removal
- Low vibration for comfortable extended use
- Effective dust collection system
- Variable speed control for versatile applications
Cons:
- Battery and charger sold separately
- Dust collection system requires compatible dust extractor
- Price not included in the data
Best for: Woodworkers already using compatible 20V MAX batteries.
Not ideal for: Buyers who need a complete kit but have not checked package contents.
Bottom line: Verify battery fit and package contents, then match the sanding discs to your workflow.
Digital Angle Gauge
An angle gauge can support setup and measurement tasks where checking an angle is part of your routine. The listed pick is the Wixey Digital Protractor with Miter Function, described as 18 inches (457 mm). Review the full product specifications to understand its measuring range, resolution, display, and operating requirements, then compare those details with the angles and surfaces you need to measure. A common mistake is choosing a gauge by length alone. Think about where you will use it, how much room you have to position it, and whether its form suits the surfaces you need to compare. Check how the miter function is used and whether the readout or controls work for your setup. Verify the unit’s stated measurement range and any calibration or battery details in the product documentation. If you plan to use it with a saw or other tool, confirm that the gauge can be positioned safely and that its measurements match the setup process you follow. A quick compatibility check helps ensure the tool’s functions are relevant to your actual jobs.What to look for:
- Review the stated measuring range and resolution.
- Confirm the 18-inch length suits your work surfaces.
- Check how the miter function is used.
- Verify display, controls, and operating requirements.
- Review calibration guidance and tool setup compatibility.
Wixey Digital Protractor with Miter Function – 18" (457mm)

The Wixey Digital Protractor measures angles in any plane and sets both miter and bevel angles on woodworking machinery. It features strong magnets on all blade edges for ease of use and allows blades to be tightened for secure measurements.
Pros:
- Accurate angle measurement in any plane
- Easy to use with magnetic blades
- Suitable for woodworking projects
Cons:
- Limited to woodworking and similar applications
- Requires batteries (not specified)
- May be overkill for simple tasks
Best for: Woodworkers who regularly measure angles and miter setups.
Not ideal for: Those who have not confirmed the gauge’s range or use case.
Bottom line: Choose based on the measurement range and setup tasks you actually need to handle.
For a budget-first buying order, begin with the shop need that affects the most work: map dust collection and machine connections, then address workholding or setup gaps that slow your projects. Add a router table, clamps, sander, or angle gauge when its role and compatibility are clear.
Use the checklist to measure first, verify the current product details, and build your shop one useful upgrade at a time. A well-matched tool is easier to integrate into the work you already do.
Halloween Picks
halloween
As an affiliate, we earn on qualifying purchases.